


Table of Contents
- Why Make Granola Bars Yourself?
- Ingredients That Matter More Than You Think
- The Quiet Power of Peanut Butter and Honey
- How Do You Get Granola Bars That Are Chewy, Not Crumbly?
- How Long Should Granola Bars Actually Bake?
- A Snack That Works as Breakfast
- Making Them Once, Enjoying Them All Week
- How Flexible Is This Granola Bars Recipe?
- A Recipe That Earns Its Place
- Jump to Recipe
Why Make Granola Bars Yourself?
Granola bars have quietly become one of the most relied-upon foods of our time. They live in glove compartments, gym bags, desk drawers, and school backpacks. They are breakfast when breakfast doesn't happen, lunch when lunch is rushed, and a snack when energy dips in the late afternoon. And yet, despite their ubiquity, most of us rarely stop to ask whether the granola bars we rely on are actually doing what we want them to do.
I started making granola bars at home not out of culinary ambition, but necessity. I wanted something dependable, quick, and nourishing, something that didn't require decoding a long ingredient list or sacrificing flavor for convenience. What I discovered was that homemade granola bars are not only easier than most people expect, but vastly more satisfying than their store-bought counterparts.
They are warmer. Softer. More forgiving. And once you make them once, they become part of your rhythm.

Ingredients That Matter More Than You Think
What makes these Granola Bars taste better than store-bought ones?
The secret to truly good granola bars isn't complexity, it's restraint. A short list of ingredients, each doing real work, creates a bar that feels intentional rather than engineered.
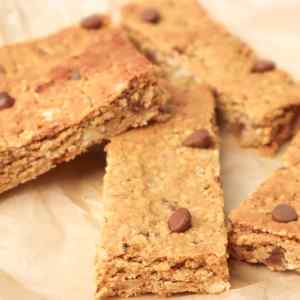
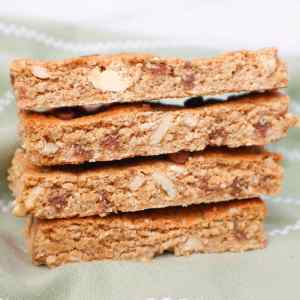
Rolled oats provide structure and chew. Peanut butter brings richness and body, acting as both flavor and glue. Honey sweetens gently while binding everything together, eliminating the need for refined sugars or syrups. Vanilla adds warmth, salt sharpens the sweetness, and chocolate chips deliver just enough indulgence to make these bars feel like a treat rather than a compromise.
Cashews, chopped finely, introduce texture without overwhelming the bar. They add a quiet crunch that contrasts beautifully with the soft, chewy base.
When you combine these ingredients, something subtle but important happens: the granola bars taste like food, not a product.
The Quiet Power of Peanut Butter and Honey
Peanut butter and honey are a classic pairing for a reason. Together, they create balance. Peanut butter is rich, savory, and grounding. Honey is floral, sweet, and fluid. When stirred together, they form a smooth base that coats oats evenly and sets beautifully once baked.
Unlike butter-heavy or oil-based recipes, this combination produces granola bars that stay soft without becoming greasy. It also allows the bars to hold their shape without drying out, even days later.
From a practical standpoint, this pairing also simplifies the process. There's no melting, no stovetop step, no special equipment. Just stir, press, and bake.
That simplicity is what makes these granola bars repeatable, and repetition is what turns a recipe into a habit.

How Do You Get Granola Bars That Are Chewy, Not Crumbly?
If there's one complaint people have about homemade granola bars, it's texture. Too dry. Too crumbly. Too brittle.
The solution is pressure and patience.
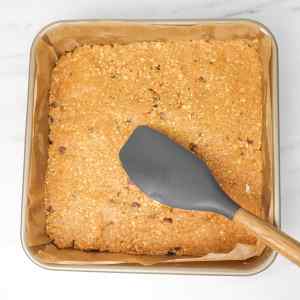
Pressing the mixture firmly into the pan is not optional, it's essential. This step ensures the oats and nut butter bind together as they bake. Think of it less as spreading and more as packing. Every inch should feel compact and intentional.
Cooling is just as important. Cutting the bars too soon will undo all that careful work. When fully cooled, the bars set into neat slices that hold together beautifully.
The result is a granola bar that bends slightly when you hold it, but doesn't fall apart. That texture, the one that feels both hearty and indulgent, is what separates good granola bars from forgettable ones.
How Long Should Granola Bars Actually Bake?
Granola bars are forgiving, but timing still matters.
A short bake between 10 and 12 minutes, is all that's needed. At 10 minutes, the bars are softer and chewier. At 12, they're slightly firmer, with more structure and toasted edges.
What you're looking for is subtle color around the edges and a surface that looks set but not dry. Overbaking is the quickest way to lose that tender interior.
Remember: Granola bars continue to firm up as they cool. Pull them earlier than you think you should, and let time do the rest.

A Snack That Works as Breakfast
On busy mornings, the idea of a “proper” breakfast can feel aspirational at best. Granola bars bridge the gap between intention and reality.
With oats for sustained energy, peanut butter for protein and fat, and honey for quick fuel, these bars offer balance in a portable form. Paired with a piece of fruit or a cup of coffee, they hold their own remarkably well.
They are also predictable in the best way. There's comfort in knowing exactly what you're eating, and how it will make you feel an hour later.
These granola bars don't spike and crash. They steady you.
Making Them Once, Enjoying Them All Week
One of the most compelling arguments for homemade granola bars is how well they store. Kept in an airtight container, they last several days at room temperature and even longer in the refrigerator.
That makes them ideal for meal prep. One short baking session produces a week's worth of snacks, breakfasts, or after-school fuel.
They're also adaptable. Wrap them individually for lunches. Keep a few in the fridge for quick grabs. Freeze extras for later.
In a week full of decisions, granola bars quietly remove one.

How Flexible Is This Granola Bars Recipe?
This recipe welcomes variation. Swap cashews for almonds, peanuts, or seeds. Add dried fruit in place of chocolate. Use dark chocolate for less sweetness, or skip it altogether.
What matters is maintaining the ratio: enough dry ingredients to hold structure, enough binding ingredients to keep everything cohesive.
Once you understand that balance, granola bars become a template rather than a rulebook.

Granola Bars
Equipment
- Spoon or spatula
- 8x8-inch baking pan
- Measuring cups and spoons
- Knife (for slicing)
- Airtight container (for storage)
Ingredients
- 250 Grams Smooth peanut butter
- 225 Grams Honey
- 1 Teaspoon Vanilla extract
- ½ Teaspoon Sea salt
- 225 Grams Whole rolled oats
- 60 Grams Chocolate chips
- 3 Tablespoons Cashews chopped
Instructions
- Preheat your oven to 170°C (340°F) and line an 8.8 baking pan with parchment paper, leaving a little overhang for easy removal.

- In a large mixing bowl, add the peanut butter, honey, vanilla extract, and sea salt. Stir until smooth and well combined.250 Grams Smooth peanut butter, 225 Grams Honey, 1 Teaspoon Vanilla extract, ½ Teaspoon Sea salt
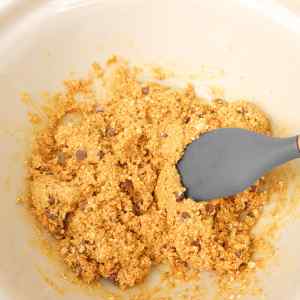
- Add the rolled oats, chocolate chips, and chopped cashews to the bowl. At first the mixture may feel a little dry, but keep stirring until everything is evenly coated and comes together into a thick, sticky mixture.225 Grams Whole rolled oats, 60 Grams Chocolate chips, 3 Tablespoons Cashews

- Transfer the mixture to the prepared pan and press it down firmly using a spatula or the back of a spoon, making sure it's packed tightly and evenly.
- Sprinkle a few extra chocolate chips over the top and gently press them in.
- Bake for 10-12 minutes, or until the edges are lightly golden and the top looks set.
- Remove from the oven and allow the granola to cool completely in the pan before lifting it out and slicing into bars.
- Store the bars in an airtight container once fully cooled.


Notes
- Press firmly: Compacting the mixture well helps the bars hold together once sliced.
- Cool completely: Letting the granola bars cool fully before cutting prevents crumbling.
- Chewier bars: Bake closer to 10 minutes for softer, chewier bars.
- Crunchier bars: Bake the full 12 minutes for a firmer texture.
- Easy swaps: Cashews can be replaced with almonds, peanuts, or sunflower seeds.
- Storage: Keep at room temperature for up to 5 days or refrigerate for longer freshness.
Nutrition
A Recipe That Earns Its Place
Some recipes don't need reinvention, they earn their place by simply being reliable. These granola bars are the kind you come back to again and again, the ones you make without checking the measurements and reach for without hesitation. If you enjoy this style of everyday, feel-good cooking, you'll also love our homemade granola, classic muesli, apple & cinnamon overnight oats, and oat cookie energy balls, all designed for real life and real schedules. You can find those recipes on the site, along with daily inspiration, tips, and behind-the-scenes moments over on our social media.