


Table des matières
- Pourquoi j'adore ces boulettes de pâte à l'ail
- Conseils pour une pâte moelleuse et une garniture à l'ail beurrée
- Variantes faciles
- Ajouter du fromage
- Ajoutez un peu de chaleur
- Dépannage des boulettes de pâte à l'ail
- Que servir avec eux
- Questions fréquentes
- Puis-je diviser par deux cette recette de boulettes de pâte à l'ail ?
- Peut-on congeler les boules de pâte à l'ail ?
- Pourquoi faut-il cuire les boules de pâte avant d'ajouter le beurre à l'ail ?
- Comment savoir quand les boules de pâte sont complètement cuites ?
- Pourquoi utiliser un plat à bords hauts pour le gratin au beurre à l'ail ?
- Comment conserver les restes de boulettes de pâte à l'ail ?
- Les boulettes de pâte à l'ail sont-elles la même chose que les nœuds à l'ail ?
- Aller à la recette
Pourquoi j'adore ces boulettes de pâte à l'ail
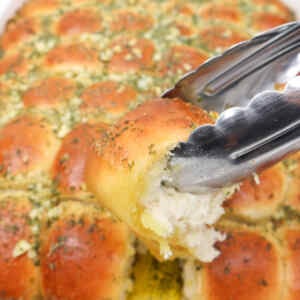
Ces boulettes de pâte à l'ail sont le genre de recette que je prépare quand j'ai envie d'un accompagnement chaud et beurré pour un petit groupe. La pâte dore à l'extérieur et reste moelleuse à l'intérieur, puis est nappée d'un riche beurre à l'ail qui fond sur chaque bouchée.

Pourquoi j'adore ces boulettes de pâte à l'ail
Cette recette donne une quantité généreuse, mais vous pouvez bien sûr la diviser par deux si vous n'en avez pas besoin d'autant. J'aime préparer la quantité complète car ces boules de pâte sont parfaites pour préparer mes repas à l'avance. Il m'arrive même d'en faire une double portion, de les portionner et de les conserver pour accompagner mes plats pendant les deux mois suivants.
Elles se congèlent très bien aussi. Il suffit de congeler les boules de pâte cuites et refroidies avant d'étaler le beurre à l'ail. Pour le dîner, décongelez-les, ajoutez le beurre à l'ail et faites-les cuire au four jusqu'à ce qu'elles soient chaudes et bien aillées.
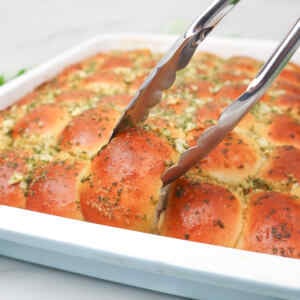
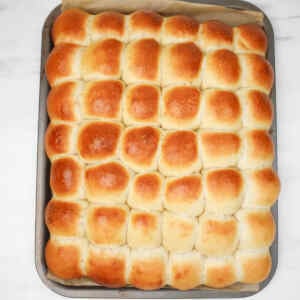
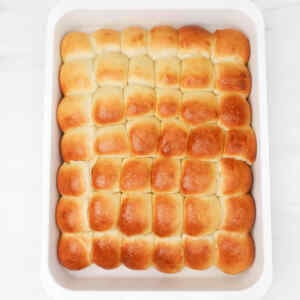
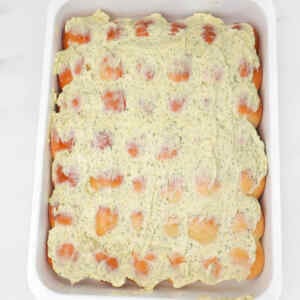
La cuisson en deux étapes confère à ces boules de pâte leur texture moelleuse et leur riche saveur d'ail. Commencez par les cuire sur une plaque de cuisson jusqu'à ce qu'elles soient bien dorées et cuites à cœur. Une fois refroidies, transférez-les dans un plat à four profond, badigeonnez-les de beurre à l'ail et remettez-les au four. Les bords hauts du plat retiennent le beurre fondu autour du pain, évitant ainsi qu'il ne coule sur la sole du four.
Je sers toujours cette recette avec mes pizzas maison et mes spaghettis bolognaise traditionnels. C'est moelleux, savoureux, facile à partager et parfait pour saucer ou pour agrémenter un repas en famille.

Conseils pour une pâte moelleuse et une garniture à l'ail beurrée
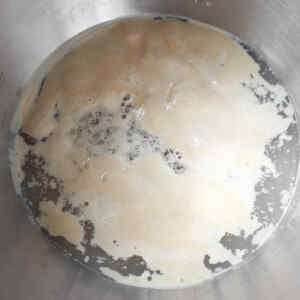
Il faut d'abord surveiller le mélange de levure. Après avoir mélangé l'eau tiède, la levure instantanée et le sucre, le mélange doit dégager une odeur de levure et paraître actif. C'est un bon signe que la pâte est prête à être pétrie.
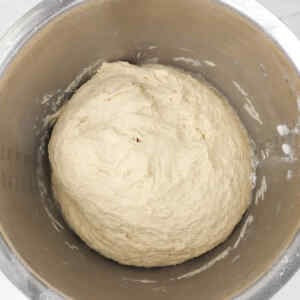
Ajoutez progressivement la farine à pain tout en pétrissant à faible vitesse. La pâte doit se détacher des parois du bol sans être sèche. Prélevez-en une petite portion et formez-en une boule : elle doit être souple et légèrement collante au toucher.
Si la pâte est trop collante, ajoutez de la farine petit à petit. Quelques cuillères à soupe à la fois suffisent. Trop de farine risque de rendre les boules de pâte moins moelleuses.

Laissez les boules de pâte façonnées lever jusqu'à ce qu'elles soient bien gonflées. Ce signe visuel est important car il contribue à obtenir une texture plus légère après cuisson. Utilisez une balance de cuisine si vous souhaitez des morceaux de taille plus uniforme.
Un plat à four à bords hauts est important pour la garniture. Il permet de retenir le beurre à l'ail fondu autour des boules de pâte et d'éviter qu'il ne s'écoule. Laissez refroidir les boules de pâte cuites avant d'ajouter la garniture ; elles seront ainsi plus faciles à manipuler et à enrober.

Variantes faciles
Ajouter du fromage
Pour des boulettes de pâte à l'ail et au fromage, insérer un petit cube de mozzarella au centre de chaque boulette avant la cuisson. Vous pouvez également saupoudrer de parmesan râpé la garniture au beurre à l'ail avant la dernière cuisson pour une touche salée et savoureuse.
Ajoutez un peu de chaleur
Incorporez une pincée de flocons de piment rouge à la garniture au beurre à l'ail avant de la répartir sur les boules de pâte. Cela apporte une douce chaleur qui se marie parfaitement avec l'ail, le persil et le sel marin.

Dépannage des boulettes de pâte à l'ail
Si la pâte est trop collante, ajoutez de la farine, quelques cuillères à soupe à la fois, jusqu'à ce qu'elle soit souple et légèrement collante. Si les boules de pâte cuisent de façon inégale, utilisez une balance de cuisine pour qu'elles soient de taille similaire. Si elles ne lèvent pas bien, vérifiez que la levure est active avant de préparer la pâte. Si le beurre à l'ail commence à s'échapper, utilisez un plat à four à bords hauts. Faites cuire les boules de pâte jusqu'à ce qu'elles soient dorées et que leur température interne atteigne 88-90 °C (190-195 °F).

Que servir avec eux
Servez ces boulettes de pâte à l'ail chaudes, pendant que le beurre à l'ail est fondu et parfumé. Elles accompagnent à merveille les pizzas maison, les spaghettis bolognaise traditionnels ou tout autre plat de pâtes nécessitant un accompagnement moelleux et beurré pour saucer.
Elles sont également délicieuses en apéritif. Disposez-les au centre de la table encore chaudes et laissez chacun se servir. Elles s'accordent particulièrement bien avec un verre de vin blanc frais.
Boulettes de pâte à l'ail
Matériel
- Mélangeur sur socle (avec crochet pétrisseur)
- torchon de cuisine propre ou film plastique
- Plat à four à bords hautsou plat à rôtir
Ingrédients
Pour les boules de pâte
- 2 tasses eau chaude environ 100°F
- 2 cuillères à soupe levure instantanée
- ¼ Coupe Sucre en poudre
- 1 cuillerée à soupe sel
- 1 grande Oeuf légèrement battu
- ¼ Coupe l'huile d'olive
- 7 ¾ tasses farine à pain
- 1 gros œuf pour le badigeonnage à l'œuf
- 1 éclabousser eau pour le badigeonnage à l'œuf
Pour la garniture au beurre à l'ail
- ½ Coupe beurre non salé
- 3 gousses d'ail haché
- 1 cuillère à café persil séché
- 1 cuillère à café poudre d'ail
- ½ cuillère à café sel de mer
- 1 cuillerée à soupe l'huile d'olive
Préparation
- Ajoutez l'eau tiède, la levure instantanée et le sucre dans le bol d'un batteur sur socle.2 tasses d'eau tiède, 2 cuillères à soupe de levure instantanée, ¼ tasse de sucre granulé

- Laisser reposer le mélange quelques minutes, jusqu'à ce qu'il dégage une légère odeur de levure et qu'il paraisse actif.
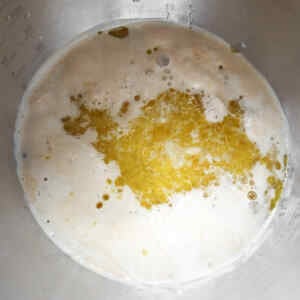
- Ajoutez l'œuf légèrement battu, l'huile d'olive et le sel dans le bol.1 cuillère à soupe de sel, 1 gros œuf, ¼ tasse d'huile d'olive
- Avec le crochet pétrisseur en marche à basse vitesse, ajoutez la farine à pain une tasse à la fois.7 ¾ tasses de farine à pain
- Continuez à mélanger jusqu'à ce que la pâte se détache des parois du bol.
- Prélevez une petite portion de pâte et formez-en une boule. Elle doit être souple et légèrement collante au toucher. Si elle est trop collante, ajoutez un peu de farine, quelques cuillères à soupe à la fois.
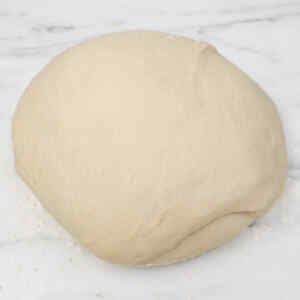
- Pétrissez la pâte pendant environ 8 minutes, jusqu'à ce qu'elle soit lisse, souple et légèrement collante.
- Laisser reposer la pâte pendant 5 minutes pour qu'elle se détende.
- Farinez légèrement votre plan de travail et déposez-y la pâte.
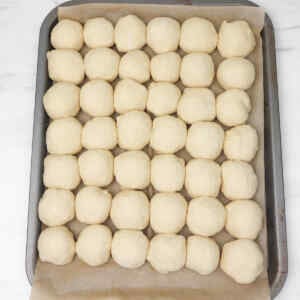
- Divisez la pâte en environ 42 portions égales, selon la taille souhaitée. Pour des boules de pâte plus régulières, utilisez une balance de cuisine.
- Façonnez chaque morceau en une boule lisse en ramenant les bords vers le centre.
- Déposez les boules de pâte sur une plaque de cuisson recouverte de papier sulfurisé.
- Recouvrir d'un torchon propre ou de film plastique.
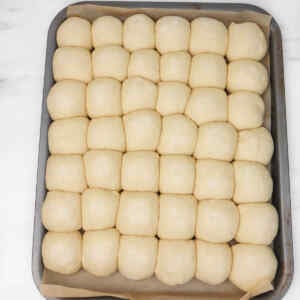
- Laissez les boules de pâte lever dans un endroit chaud pendant environ 30 minutes, ou jusqu'à ce qu'elles soient gonflées.
- Préchauffez le four à 200 °C (400 °F). Si votre four chauffe beaucoup, réduisez la température à 190 °C (375 °F).
- Dans un petit bol, fouettez l'œuf avec un peu d'eau pour obtenir la dorure.1 gros œuf, 1 éclaboussure d'eau
- Badigeonnez légèrement le dessus des boules de pâte avec la dorure à l'œuf.
- Cuire au four pendant environ 20 minutes, ou jusqu'à ce qu'ils soient dorés.
- La température interne doit atteindre 190-195°F une fois la cuisson terminée.
- Déposez les boules de pâte sur une grille et laissez-les refroidir avant d'ajouter la garniture.
- Préchauffez à nouveau le four à 400°F / 200°C.
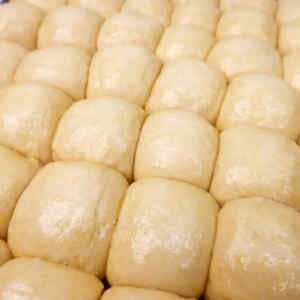
- Transférez les boules de pâte cuites dans un plat à four à bords hauts. Cela empêchera le beurre à l'ail de s'échapper pendant la cuisson.
- Dans un petit bol, mélanger le beurre non salé, l'ail haché, le persil séché, la poudre d'ail, le sel marin et l'huile d'olive jusqu'à obtenir un mélange homogène.1/2 tasse de beurre non salé, 3 gousses d'ail, 1 cuillère à café de persil séché, 1 cuillère à café de poudre d'ail, ½ cuillère à café de sel marin, 1 cuillère à soupe d'huile d'olive
- Étalez le mélange de beurre à l'ail sur les boules de pâte cuites.
- Enfournez pendant 10 minutes, jusqu'à ce que le beurre à l'ail ait fondu sur les boules de pâte.
- Servir chaud.
Notes
- Vérifiez la levure avant de préparer la pâte. Elle doit avoir une odeur de levure et paraître active après avoir reposé avec l'eau tiède et le sucre.
- La pâte doit être souple et légèrement collante, pas sèche. Ajoutez de la farine, quelques cuillères à soupe à la fois, si nécessaire.
- Utilisez une balance de cuisine si vous souhaitez des boules de pâte de taille uniforme. Cela permettra une cuisson homogène.
- Laissez les boules de pâte lever jusqu'à ce qu'elles soient bien gonflées avant de les cuire. Cela leur donnera une texture plus moelleuse.
- Utilisez un plat à bords hauts pour la préparation au beurre à l'ail. Cela permettra de contenir le beurre fondu dans le plat et d'éviter qu'il ne déborde.
- Laisser refroidir les boules de pâte avant d'ajouter la garniture afin qu'elles soient plus faciles à transférer et à enrober.
- Servez les boulettes de pâte à l'ail chaudes pour une texture et une saveur optimales.
Valeurs nutritionnelles
Questions fréquentes
Puis-je diviser par deux cette recette de boulettes de pâte à l'ail ?
Oui. La recette complète donne environ 42 boules de pâte, mais vous pouvez diviser les quantités par deux pour une plus petite quantité. Essayez de faire des boules de taille similaire pour une cuisson uniforme.
Peut-on congeler les boules de pâte à l'ail ?
Oui. Faites cuire les boules de pâte et laissez-les refroidir complètement, puis congelez-les avant d'ajouter le beurre à l'ail. Décongelez-les au réfrigérateur, ajoutez la garniture et faites cuire jusqu'à ce qu'elles soient chaudes et dorées.
Pourquoi faut-il cuire les boules de pâte avant d'ajouter le beurre à l'ail ?
La première cuisson des boules de pâte permet de les cuire à cœur et de les dorer avant l'ajout du beurre. La seconde cuisson fait fondre le beurre à l'ail sur les boules de pâte sans les détremper.
Comment savoir quand les boules de pâte sont complètement cuites ?
Les boules de pâte doivent être bien dorées à l'extérieur. Pour une vérification plus précise, la température interne doit atteindre 88-90 °C (190-195 °F).
Pourquoi utiliser un plat à bords hauts pour le gratin au beurre à l'ail ?
Un plat à four ou un plat à rôtir à bords hauts permet de retenir le beurre à l'ail fondu autour des boules de pâte. Cela empêche le beurre de s'échapper du plat pendant la cuisson.
Comment conserver les restes de boulettes de pâte à l'ail ?
Laissez les boules de pâte refroidir, transférez-les dans un récipient hermétique et mettez-les immédiatement au réfrigérateur. Consommez les restes conservés au réfrigérateur dans les trois à quatre jours et ne réchauffez que la quantité nécessaire.
Les boulettes de pâte à l'ail sont-elles la même chose que les nœuds à l'ail ?
On utilise plusieurs ingrédients similaires, mais les boules de pâte à l'ail sont façonnées en petits pains ronds plutôt que nouées. Cette recette prévoit également une seconde cuisson pour faire fondre le beurre à l'ail sur le pain.


