


Table of Contents
- Cheese Scones: A Timeless Recipe for Every Kitchen
- What Makes Cheese Scones So Special?
- How Do You Choose the Right Ingredients?
- Why Cold Butter Matters
- How Should You Handle the Dough?
- Why Preheating the Oven and Tray Makes a Difference
- Can Cayenne Pepper Really Improve Cheese Scones?
- What Makes These Cheese Scones Timeless?
- How Do You Know When Cheese Scones Are Perfectly Baked?
- Tips and Tricks for Consistently Great Cheese Scones
- Jump to Recipe
Cheese Scones: A Timeless Recipe for Every Kitchen
Some recipes arrive in our lives quietly and never leave. For me, Cheese Scones are exactly that kind of recipe. They are simple, comforting, and utterly dependable, an essential in my kitchen that has stayed unchanged since my mum first taught me how to make them. Over the years, I've watched friends and family fall in love with the same golden, cheesy rounds I grew up eating, and I've learned that a few thoughtful steps make all the difference in getting them just right.
Whether it's for brunch, tea time, or a savory snack, these scones strike a perfect balance between crisp edges and tender, cheesy centers. But what is it that makes Cheese Scones such a universal favorite? Let's start from the very beginning.

What Makes Cheese Scones So Special?
Cheese scones are more than the sum of their ingredients. Their texture, crispy on the outside, soft and tender on the inside, comes from a careful balance of flour, butter, and cheese. The key is in keeping the butter cold and handling the dough lightly. Overworked dough leads to dense, heavy scones, while gentle treatment preserves air pockets that puff up beautifully in the oven.
The cheese, in my case, mature cheddar, adds depth of flavor and richness without being overpowering. It's a savory punch in every bite that elevates a simple scone to a comfort-food classic. I've tried other cheeses, but cheddar always hits the perfect balance of melt, flavor, and nostalgia.
How Do You Choose the Right Ingredients?
Starting with self-raising flour is crucial, it gives the scones their rise without needing extra yeast. A pinch of salt and a touch of cayenne pepper bring subtle seasoning that enhances the cheese without stealing the show.
Butter should be cold, straight from the fridge, cut into cubes. This ensures the scones remain flaky rather than greasy. And the cheese? Use mature cheddar for full flavor, grate it yourself if possible, and reserve a little for topping so that golden, cheesy crust develops as they bake.
Milk ties the dough together, but adding it gradually helps control the consistency. The dough should be soft but firm, not sticky or runny. Every ingredient has a purpose, and respecting them is what turns a simple recipe into the Cheese Scones everyone remembers.

Why Cold Butter Matters
Cold butter is non-negotiable in this recipe. When rubbed lightly into the flour, it creates tiny pockets of fat that melt in the oven, forming the tender, layered structure we all love. If your butter warms too much from your hands, the dough becomes heavy and loses its lift.
I like to work quickly, using my fingertips to combine butter and flour until the mixture resembles fine breadcrumbs. At this stage, you also gently fold in most of the cheddar, ensuring even distribution without melting the butter. That careful balance is what gives the scones their signature fluffiness and cheesy flavor.

How Should You Handle the Dough?
Once the butter and cheese are combined with the flour, the milk comes in slowly to form a soft but firm dough. It's tempting to knead extensively, but resist it. Overworking develops gluten, which results in tough scones rather than light, tender rounds.
After mixing, turn the dough onto a lightly floured surface. Gently bring it together rather than kneading. Roll it to about 2 centimeters thick, then use a round cutter pressed straight down to cut out scones. Twisting the cutter can seal the edges and prevent proper rising, so I always press straight down.
Why Preheating the Oven and Tray Makes a Difference
A preheated oven and baking tray give scones an immediate burst of heat that encourages rising. I always place a large tray in the oven ahead of time and slide the scones on with baking parchment. This initial shock sets the scones' structure, allowing the butter and cheese to puff the dough quickly for golden, airy scones.
Brushing the tops with a little milk and sprinkling extra cheese ensures a beautiful, golden crust that tastes as good as it looks. This final touch transforms them from ordinary to irresistible.

Can Cayenne Pepper Really Improve Cheese Scones?
Cayenne is optional, but just a tiny pinch adds a surprising depth to the scones. It accentuates the sharpness of the cheddar without making the scones spicy. Think of it as the whisper behind the main melody of cheese, a subtle nudge that makes the flavors pop and keeps your taste buds engaged.
Even without the cayenne, these scones are outstanding, but I encourage trying it at least once, it's a small adjustment with a noticeable impact.
What Makes These Cheese Scones Timeless?
My mum made these Cheese Scones for tea when I was a child, and the recipe hasn't changed since. Over the years, I've tried variations and shortcuts, but nothing beats the original method. There's something about recipes that stand the test of time, they carry memory, comfort, and consistency in every bite.
Baking these scones connects me to that past, and sharing them with friends and family keeps the tradition alive. In a world of constant culinary innovation, having one recipe that never fails is a true gift.

How Do You Know When Cheese Scones Are Perfectly Baked?
Golden brown on top, risen evenly, and slightly firm to the touch, that's what you're looking for. The smell is unmistakable: warm, cheesy, and inviting. A few minutes of cooling on a wire rack enhances the texture, but don't wait too long, cheese scones are best enjoyed warm, fresh from the oven.
Serve them as they are or with a slather of butter. They're perfect for brunch, tea time, or a savory snack any time of day.

Tips and Tricks for Consistently Great Cheese Scones
- Keep everything cold: Cold butter is essential for flaky, tender scones. Work quickly to avoid melting it.
- Don't overmix: The dough should come together gently. Stop mixing once it holds.
- Straight cuts matter: Press the cutter straight down; twisting prevents proper rise.
- Extra cheesy top: Sprinkle leftover cheddar on top for a deeper, golden crust.
- Serve fresh: These scones are at their best warm, though they can be reheated gently.
- Experiment subtly: Add herbs like chives or thyme to complement the cheddar.

Cheese Scones
Equipment
- Baking parchment
- 8 cm round cutter
Ingredients
- 450 Grams Self-raising flour plus extra for dusting
- 1/8 Teaspoon Cayenne pepper
- 1/8 Teaspoon Salt
- 2 Teaspoons Baking powder
- 110 Grams Chilled butter cut into cubes
- 240 Grams Mature cheddar grated
- 200 Milliliters Milk plus extra for glazing
Instructions
- Preheat your oven to 200°C (180°C fan / gas 6) and place a large baking tray inside to heat up. Line another tray or board with baking parchment and set aside.

- In a large mixing bowl, sift together the self-raising flour, salt, cayenne pepper, and baking powder to evenly distribute the dry ingredients.450 Grams Self-raising flour, 1/8 Teaspoon Cayenne pepper, 1/8 Teaspoon Salt, 2 Teaspoons Baking powder

- Add the chilled, cubed butter to the bowl and rub it into the flour using your fingertips until the mixture resembles fine breadcrumbs. Work quickly and lightly to keep the butter cold.110 Grams Chilled butter
- Stir 200 grams of the grated cheddar into the breadcrumb mixture, gently mixing until evenly combined without overworking into a dough.240 Grams Mature cheddar
- Make a well in the center of the bowl and gradually pour in the milk, mixing with a knife or your hands until a soft but firm dough forms. Add the milk a little at a time, you may not need it all.200 Milliliters Milk
- Turn the dough out onto a lightly floured surface and gently bring it together. Roll it out to about 2 cm thick, then cut out rounds using an 8 cm cutter, pressing straight down without twisting.
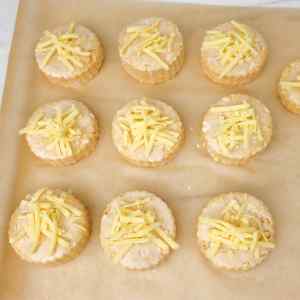
- Arrange the scones on baking parchment, brush the tops lightly with milk, and sprinkle with the remaining grated cheese. Carefully transfer the parchment onto the preheated baking tray.
- Bake for 15-20 minutes, or until the scones are well risen, golden on top, and cooked through. Remove from the oven and allow to cool slightly before serving.


Notes
- Keep everything cold: Cold butter helps create flaky, tender scones, so avoid overhandling the dough.
- Don't overmix: A light touch keeps the scones soft. Stop mixing as soon as the dough comes together.
- Straight cuts matter: Press the cutter straight down to help the scones rise evenly.
- Extra cheesy top: For a deeper golden crust, add a little extra grated cheese just before baking.
- Best served fresh: Cheese scones are at their best warm from the oven, but can be reheated gently if needed.
Nutrition
Cheese Scones are more than just a savory treat, they're comfort, tradition, and simple indulgence in every bite. From their crisp edges to tender, cheesy centers, they're perfect for brunch, tea, or a filling breakfast at home. With just a few careful steps and quality ingredients, anyone can bake scones that feel both timeless and irresistible.
If you love these Cheese Scones, don't miss our other classic, timeless bakes like heavenly buttermilk scones and blueberry scones, all perfect for bringing a touch of homemade comfort to your table. For more recipes, tips, and kitchen inspiration, follow us on our social media and stay connected with our latest culinary ideas.