


Table of Contents
- Oreo Cake Recipe: Can Dessert Ever Be Too Decadent?
- What Makes an Oreo Cake So Special?
- Why Should You Try Baking This Oreo Cake at Home?
- What's the Secret to the Perfect Oreo Cake Sponge?
- How Do You Make the Perfect Oreo Buttercream?
- How Should You Assemble the Cake?
- Can You Customize This Oreo Cake?
- How Do You Store and Serve Oreo Cake?
- Can a Cake Hold a Memory?
- Want to Try More Cakes Like This?
- Join Me Beyond the Blog
- Jump to Recipe
Oreo Cake Recipe: Can Dessert Ever Be Too Decadent?
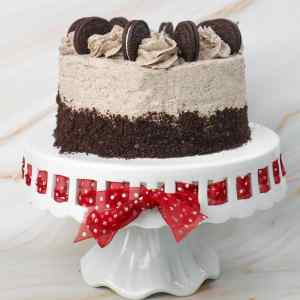
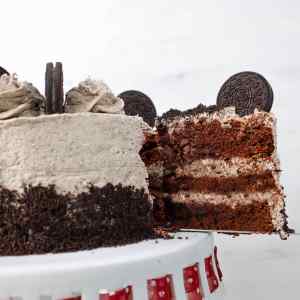
There's something undeniably joyful about baking a cake that feels like a celebration in itself. For me, that's exactly what this Oreo cake is: three layers of rich chocolate sponge, a cloud of cookies and cream buttercream, and enough Oreo crunch to make even the most reserved guest grin like a kid again.
I still remember the first time I made this cake. It was my daughter's 12th birthday, and she asked for “something with Oreos, but not just Oreos.” Challenge accepted. What came out of the oven was more than just a dessert; it was a showstopper, a centerpiece, and a guaranteed repeat request at every family gathering since.

What Makes an Oreo Cake So Special?
If you're wondering what sets this cake apart, it's the balance between indulgence and nostalgia. I grew up with simple chocolate cakes that were moist, sweet, and perfect for every occasion. But Oreos add a twist. They bring crunch, creaminess, and that unmistakable flavor that's both familiar and fun.
The secret lies in layering textures. You get the velvety richness of the dark chocolate sponge, the silky smooth Oreo buttercream, and the satisfying bite from crushed cookies. Each element complements the other, creating a dessert that's not just sweet but deeply satisfying.
When I first tested this recipe, I wanted something bakery-worthy but achievable at home, a cake that anyone could bake and feel proud of. So if you've ever scrolled past elaborate cakes online and thought, “I could never make that,” I'm here to tell you that you absolutely can.
Why Should You Try Baking This Oreo Cake at Home?
There's a certain magic that happens when you bake from scratch. You control the ingredients, the texture, the sweetness, and best of all, the love that goes into every step. Store-bought cakes might look perfect, but they rarely carry the same warmth or satisfaction.
This Oreo Cake is not complicated. It's about process and patience. Melt the chocolate and butter until glossy. Stir in the coffee for depth. Yes, coffee. It doesn't make the cake taste like coffee, it just deepens the chocolate flavor beautifully. Whisk your eggs and buttermilk until smooth, fold everything together, and watch as the batter transforms into something rich and indulgent.
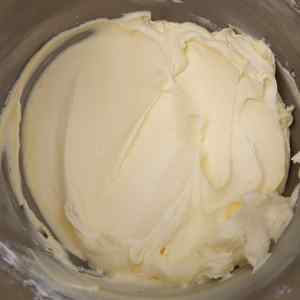
Then there's the buttercream. Soft, fluffy, sweet, and speckled with crushed Oreos. I could eat it by the spoonful, though I try to save enough for the cake itself. The trick is to beat the frosting long enough; that's how you get that light, cloud-like texture.

What's the Secret to the Perfect Oreo Cake Sponge?
I've baked a lot of cakes, and I can confidently say that the difference between “good” and “great” is usually technique, not fancy ingredients. The key to a soft, moist sponge here is balance, a good ratio of butter, sugar, eggs, and buttermilk.
Dark chocolate gives the cake a deep cocoa flavor, while instant coffee amplifies it without overwhelming. A mix of caster sugar and light brown sugar ensures sweetness and moisture. The buttermilk keeps the texture tender and prevents dryness, a baker's best friend.
Another tip? Don't overbake. The moment a skewer comes out clean, your cakes are ready. Let them cool completely before frosting. Rushing this step is one of the most common cake-making mistakes. Warm cake plus buttercream equals a slippery, melty mess (trust me, I've learned that the hard way).
How Do You Make the Perfect Oreo Buttercream?
This is where the cake truly comes to life. The Oreo buttercream isn't just frosting; it's the personality of the entire dessert.
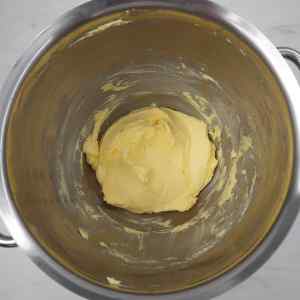
I start by beating the butter until it's pale and fluffy. This alone takes a few minutes and it's worth every second. Then comes the icing sugar, added slowly to avoid a sugar storm, followed by milk and vanilla extract for creaminess and balance.
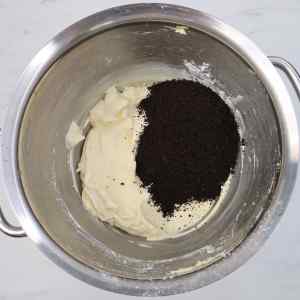
Finally, the Oreos. I blend them into fine crumbs before mixing them into the buttercream, ensuring every bite has that cookies and cream goodness. It's the kind of frosting that makes people close their eyes and say, “Wow.”
If you want a smoother finish, you can sift the crumbs before adding them, but I like the texture. It reminds me that real Oreos went into it, not artificial flavoring or extracts, but the real deal.

How Should You Assemble the Cake?
Once your cakes have cooled and your buttercream is ready, it's time for the best part: building your masterpiece.
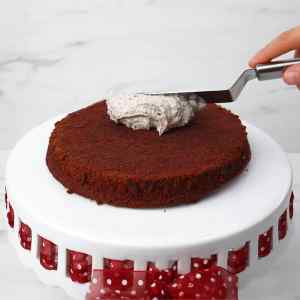
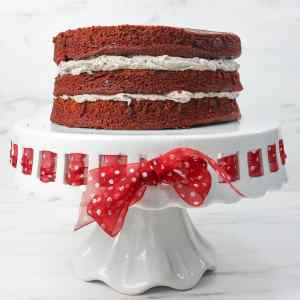
Start with a layer of cake on your stand or plate. Spread a generous scoop of Oreo buttercream on top, smooth it out, then add the next layer. Repeat until all three layers are stacked and the cake looks impressively tall.
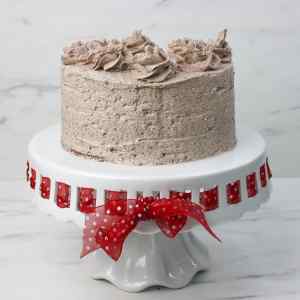
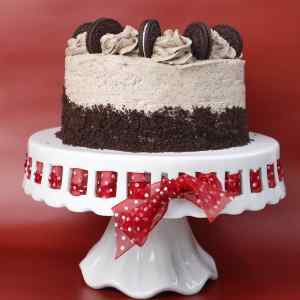
From here, you can decide how dressed up you want your cake to be. I often go for a full coat of frosting, smooth on the sides, and a few piped swirls on top. Sometimes, I'll press crushed Oreo crumbs along the bottom edge for texture. And if I'm feeling fancy, I'll crown the top with whole Oreos. It never fails to impress.
For the best results, chill the cake for a couple of hours before slicing. It helps everything set and makes the slices cleaner.

Can You Customize This Oreo Cake?
Absolutely, and I encourage it. Recipes like this one are a foundation, not a limitation. You can swap the buttercream for cream cheese frosting if you like something tangier. Add a layer of ganache between the cakes for extra richness. Or even sprinkle crushed Oreos between the layers for more crunch.
I've also made a mini version of this cake using just two layers, which works beautifully for smaller gatherings. And if you love cupcakes, the same batter can be used to make an incredible Oreo cupcake version, just adjust the baking time to about 18 minutes.
How Do You Store and Serve Oreo Cake?
This cake keeps beautifully, though it rarely lasts long in my house. Store it covered in the fridge for up to five days. Before serving, let it sit at room temperature for 20 to 30 minutes so the buttercream softens and the flavors shine.
You can also freeze the unfrosted cake layers for up to two months. Just wrap them tightly in cling film and defrost them overnight in the fridge when you're ready to assemble.

Can a Cake Hold a Memory?
Every time I bake this Oreo cake, I think of my daughter's birthday, the laughter, the chocolate-smeared smiles, and that first proud moment when she declared it her “favorite cake ever.” It's funny how recipes can capture memories like that, isn't it?
Food, to me, is about more than flavor. It's connection. It's tradition. And sometimes, it's as simple as sharing a slice of something sweet with someone you love.
If you've never made an Oreo cake before, I hope you'll give this one a try. Not just because it's delicious (and it truly is), but because there's something deeply rewarding about baking from scratch and seeing the joy it brings to others.
Oreo Cake
Equipment
- 3 8-inch (20cm) Cake Tins
- Pyrex (heatproof) bowl
- Piping bag (optional)
- Wire cooling rack
Ingredients
For the cake
- 225 Grams Dark chocolate
- 225 Grams Unsalted Butter
- 1 Tablespoons Instant coffee granules
- 175 Grams Plain Flour
- 25 Grams Cocoa powder
- 1 Teaspoon Baking powder
- ¼ Teaspoon Bicarbonate of soda
- 200 Grams Caster sugar
- 200 Grams Light brown sugar
- 4 Medium Eggs
- 75 Milliliters Buttermilk
Oreo Buttercream Frosting
- 16 Oreos
- 454 Grams Unsalted butter 2 cups
- 466 Grams Icing sugar 3⅔ cups
- 2 Teaspoons Vanilla extract
- 2 Tablespoons Milk
Optional Extras for Decorating
- 4-6 Oreos optional - to decorate the sides of the cake (blended into fine crumbs)
- 8 Oreos optional - to decorate the top of the cake
Instructions
Make the Cake
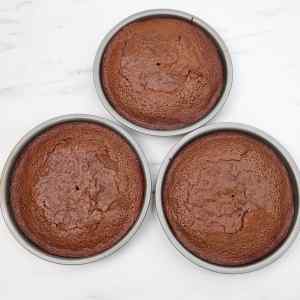
- Preheat oven to 160°C (fan). Grease and line three 8-inch (20cm) cake tins with parchment paper.

- In a large mixing bowl, whisk together flour, cocoa powder, caster sugar, light brown sugar, baking powder, and bicarbonate of soda.175 Grams Plain Flour, 25 Grams Cocoa powder, 1 Teaspoon Baking powder, ¼ Teaspoon Bicarbonate of soda, 200 Grams Caster sugar, 200 Grams Light brown sugar
- In a heatproof bowl, melt the dark chocolate and butter together over a saucepan of simmering water (or in short microwave bursts).225 Grams Dark chocolate, 225 Grams Unsalted Butter

- Dissolve the coffee granules in 125ml boiling water, then stir into the melted chocolate mixture until smooth.1 Tablespoons Instant coffee granules
- In a separate bowl, whisk the eggs and buttermilk together.4 Medium Eggs, 75 Milliliters Buttermilk
- Combine the chocolate mixture and egg mixture with the dry ingredients, mixing until smooth and slightly runny (no lumps).
- Divide batter evenly between tins. Bake for 25–30 minutes.
- Test with a skewer, if it comes out clean, the cakes are done. If not, bake for a few more minutes.
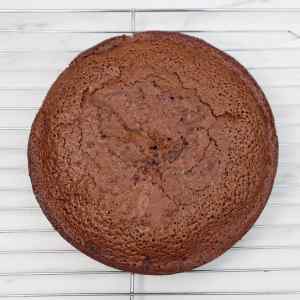
- Allow cakes to cool in tins for 10 minutes, then transfer to a wire rack to cool completely.


To make the Oreo buttercream
- In a stand mixer, beat together butter, milk, and vanilla extract.454 Grams Unsalted butter, 2 Teaspoons Vanilla extract, 2 Tablespoons Milk
- Gradually sift in the icing sugar, mixing on low until incorporated.466 Grams Icing sugar
- Increase to high speed and beat until light and fluffy (5–15 minutes).
- Finely crush the Oreos in a blender or food processor. Stir into the buttercream until evenly combined.16 Oreos

Assemble the cake
- Place one cake layer onto a serving plate or cake stand. Spread 1 cup of frosting evenly over the top.
- Repeat with the second and third cake layers.
- Cover the sides with frosting (or just a thin crumb coat if you prefer).
- For extra decoration, pipe swirls of frosting around the top edge using a piping bag and star tip.
- Decorate with whole Oreos on top and Oreo crumbs around the sides if desired.4-6 Oreos, 8 Oreos
- Chill the cake in the fridge for at least 2 hours before slicing.

Notes
- Room Temperature Ingredients: Make sure butter and eggs are at room temperature for smoother mixing.
- Level Cake Layers: If your cakes dome slightly, trim the tops before stacking for even layers.
- Buttermilk Substitute: If you don’t have buttermilk, mix 75ml milk with ½ tsp lemon juice or vinegar and let sit for 5 minutes.
- Frosting Trick: For ultra-smooth buttercream, beat it for at least 10 minutes. It gets fluffier the longer you whip it.
- Decoration Ideas: Use mini Oreos, drizzle melted chocolate, or add sprinkles for a fun twist.
- Storage: Store in the fridge for up to 5 days. Bring to room temperature before serving for the best flavor.
Nutrition
Want to Try More Cakes Like This?
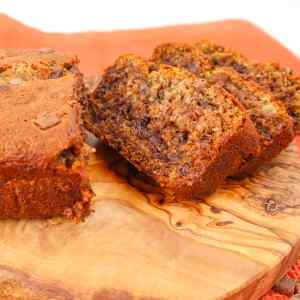
If you enjoyed this Oreo cake recipe, you might love some of my other bakes too, from my banana bread that's perfectly moist every time, to classic Victoria sponge cake, lemon drizzle cake, and even our best chocolate fudge cake ever.
Each one is tested, loved, and made with the same goal: to make baking simple, joyful, and deeply satisfying.

Join Me Beyond the Blog
If you bake this Oreo cake, I'd love to see it. Share your creation and tag us on social media. It's always amazing to see how everyone adds their own twist. You'll find me sharing tips, behind-the-scenes bakes, and new recipes on Instagram, Pinterest, and TikTok.
And if you're ever craving more baking inspiration, my website is full of easy-to-follow recipes that anyone can make, from quick desserts to showstopping cakes like this one.